
Creating the drawing
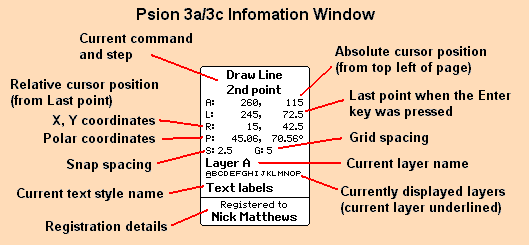
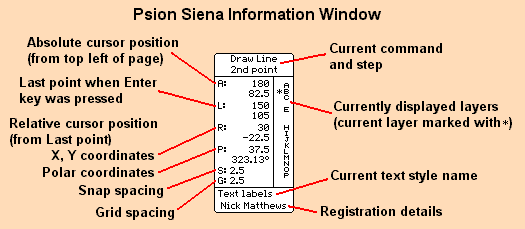
A drawing consists of a number of elements such as lines and circles. Use the Draw and Object menus to create new drawing elements. Draw each element as a series of steps, the top two lines of the Info window acts as a prompt for the current step. Between the steps it possible to move the cursor and change the settings as required. Press the Enter key to complete each step until you finish the operation. You finish a multi-step operation, such as a polygon, by pressing Enter twice without moving the cursor. Use the Delete key to go back a step and the Esc key to cancel the whole operation. Starting a new operation before completing the current one will also cancel the current operation.
Make changes to the drawing in the same step by step way. After using the Edit and Modify menus to start the required command, the first step is always to select the drawing elements that you want to change. The Info window prompts will guide you through the necessary steps for the chosen command.
Moving around
You can move around the drawing using the Arrow (or Cursor) keys or by directly jumping the cursor to a point. Also, use the Diamond key to move between up to four views on the drawing, as described in the Drawing Window section.
Moving around can involve a lot of time consuming redrawing, you can speed this up by making use of the Quick draw option. Splitting the drawing up into layers and switching On only the layers you are working on can also speed things up.
Arrow Keys
Use the Arrow keys to move the drawing cursor and screen around the drawing page. The cursor is always in view on the screen, if you move it over the edge of the screen the screen will scroll on the page to bring the cursor back into view. Conversely, moving the screen around the page moves the cursor the minimum amount to ensure it remains in view. The cursor always stops when it gets to the edge of the page.
The default action of the Arrow keys is as follows:-
| Arrow: | Accelerating cursor | |
| Shift+Arrow: | Fast cursor | |
| Ctrl+Arrow: | Fast window | |
| Ctrl+Shift+Arrow: | Slow window |
You can change the defaults and set the value of Fast and Slow from the "Settings, Preferences, Movement" menu option. A unit of movement is either the width of a pixel or, if the snap option is on, the snap spacing. If set to Accelerating cursor, the cursor will move one unit when the key is first pressed, holding the key down will result in larger and larger steps.
The Psion+Arrow keys have the following action:-
| Home: | Move cursor to top left of screen | |
| Shift+Home: | Move cursor to top left of page. | |
| End: | Move cursor to bottom right of screen. | |
| Shift+End: | Move cursor to bottom right of page | |
| Page up: | Move screen up by half the screen height | |
| Shift+Page up: | Move screen left by half the screen width | |
| Page down: | Move screen down by half the screen height | |
| Shift+Page down: | Move screen right by half the screen width |
Jump Command
The "Special, Jump" sub menu provides a number of options for moving the cursor to specific locations.
The "Jump to" sub menu gives options to move to absolute or relative positions on the page. The relative position may be relative to either the current cursor position or to the point where you last pressed Enter. You may use Cartesian (X, Y) or polar coordinates. A number of single key short cuts will bring up the "Jump to" dialogs, see the Keyboard Map section.
The jump to "Nearest" sub menu helps you move the cursor to geometric reference points based on the current drawing elements. You can move to a point with more precision than is possible by just using the Arrow keys. The cursor will jump to the required point even if the Snap is on and the point is off the Grid.
| End point: | End of any line or arc. | |
| Mid point: | Centre of any line. | |
| Intersect: | The crossing point of any two lines except lines that only touch at their ends. | |
| Centre: | The centre point of a circle or arc. | |
| Quadrant: | The quadrant points (at 0°, 90°, 180° and 270°) on the perimeter of circles and arcs. | |
| Perpendicular: | The point on a line, circle or arc that, when connected to the last Enter point, forms a normal (at 90° to) line to the element. | |
| Tangent: | The point on a circle or arc that, when connected to the last Enter point, forms a tangent to the circle or arc. |
The search for the nearest point is confined to a box around the cursor known as the Jump Area. Set the size of this box from the "Settings, Preferences, Jump area" menu option.
Making Selections
When making changes to the drawing, the first step is always to select the items you want to change. The selected part of the drawing is redrawn in grey. It may help to adjust the screen contrast so that the grey is dark enough to see, but light enough to be distinguished from black.
There are a number of ways to make a selection:-
The Vector Windows
You can use the "Settings, View windows" menu option to switch the different windows On or Off.
Drawing Window
The Drawing Window displays the current drawing and is always in view. You can use the Diamond key to cycle through up to 4 separate views on the drawing. The drawing will remember the position, cursor location, zoom setting and layers of the current view and will restore them you switch back to that view, other settings are unaffected. You can use the Diamond menu options to move directly to a view or to change the view list.
The displayed drawing viewing scale can be changed using the "Special, Zoom in/out" menu options or the single key short cuts "X" and "Z". Change the size of the zoom step with the "Settings, Preferences, Zoom step" menu option. The default is to change the scale setting by 25% on each step.
The "Special, Zoom to" sub menu gives a number of options to set the viewing scale. The single keys "B" and "E" are short cut keys for "Zoom box" and "Zoom extent".
Status Window
This is the standard Psion status window. Apart from the usual indicators, it will show the View List as used with the Diamond key. Toggle the Status Window On and Off with the normal Control+Menu short cut key or by using the View Window dialog.
Information Window
The Information Window is abbreviated to Info Window throughout this manual. The current command being carried out is displayed on the top two lines. Just "Viewing" is displayed if there is no current command. If the Info window is off, the current command and step will briefly show in the bottom right corner.


The single key "I" may be used to toggle the Info window On and Off.
Scroll Bars
The Vertical and Horizontal scroll bars show the relative size and position of the Drawing Window on the Page.